INSTRUCTIONS
Certified Buckley Rumford fireplace11/5/01
Models: R30, R36, R42 and R48
Models: R30, R36, R42 and R48
In houses with rooms or crawl spaces below the fireplace, this hearth extension is usually cantilevered and constructed of self-supporting reinforced concrete or "corbel slabs" supported by a masonry stem wall the same size as the wall surrounding the firebox. The floor joists are headed off 20" in front of the fireplace opening and as wide as the hearth base.
The face of the roughed in fireplace, without suround, is typically flush with the inside surface of the wall. The depth of the foundation needed to support the chimney depends on the construction materials and design and usually must be more than the minimum dimensions below for chimneys built on the outside of exterior frame walls. If in doubt skip ahead to Step 11 on chimneys.
A gas line stub out for a gas starter and an ash-dump can be incorporated
in the inner hearth if desired.
 Set, level and brace the steel frame for the glass door provided with the
core kit on the hearth where you want the rough firebrick opening to be -
usually flush with the inside surface of the wall.
Set, level and brace the steel frame for the glass door provided with the
core kit on the hearth where you want the rough firebrick opening to be -
usually flush with the inside surface of the wall.Build the Rumford firebox using standard 9" firebrick, laid as shiners (on edge), and refractory mortar. (You will need more firebrick if you lay them as stretchers.) Use the glass door frame as a template laying the firebrick so that the firebricks forming the front edge of the covings just meet the back inside corner of the door frame.
The clay 9"x9" wolf head air intake blocks should be laid like a double firebrick in the bottom forward corner of each coving. Looking at the fireplace, the wolf head on the left should be facing back in a more or less level attitude and the one on the right should be facing up and back as if howling at the moon. Leave a channel in the backup brick to allow outside air to be ducted in behind the wolf head blocks.
The door frame insures the correct fireplace opening size which is an important part of the certification. You are not permitted to modify it. The door frame is designed to be just the right height if you use standard firebrick and refractory mortar with minimum 1/16th inch joints.
Before staring the firebox lay out the first course of firebrick and double check all the firebox dimensions on the plan
Lay 4"x 8"x16" solid concrete block ("seventy-five percenters") on the concrete hearth base to back up the firebox. Weave the backup block together at the corners for strength and fill the space between the block and the firebrick solid with ordinary mortar.
If you are building the R30 (30" wide certified Rumford with a one-piece throat), skip the next paragraph and go to #6 in these Instructions.
When you get the backup block to the top of the fireplace opening, if you are building the R36, R42 or R48 with the segmented throat system, continue to lay block on each side of the firebox to carry the steel angle which supports the throat tiles. These block bearing surfaces should be perpendicular to the face of the fireplace opening, 12.5" above the top of the fireplace opening and 3" behind the front edge of the firebrick on each side.
For models with the segmented throat system, thread the throat tiles on the steel angle provided and set the throat, as a unit, on the two concrete block bearing surfaces. Align the bottom edges of the throat tiles against the door frame template. If you are working alone you can rest one end of the angle lintel on the block and thread the throat tiles on the other end one at a time. Don't try to mortar the throat tiles together before setting the throat. It's best to set the throat dry and then adjust the individual throat tiles to the door frame. A length of rebar mortared inside the throat tiles at the bottom can help stablize them. Work refractory mortar into the curved joint inside the firebox after the throat is in place. Ordinary mortar is fine for the front and top joints between the throat tiles as you lay the surrounding masonry
Extend the fireback 13.5" higher to the top of the throat tiles. Set the "right" and "left" coving extension tiles to meet the curved throat and add firebrick as necessary to finish the covings to the fireback.

Exterior chimneys usually extend an extra 4" away from the exterior combustible wall of the house to accommodate the clay flue liner and the required 2" air space to the siding and still be able to close the gap with whole and half bricks.
By code the chimney must extend at least three feet above the roof and two feet above any part of the roof within ten feet. Cast in place or use a pre-cast concrete chimney cap with a drip edge and caulk the joint between the cap and the top flue liner with a silicon sealant.
In Seismic Zones 2, 3, and 4 place a #4 steel reinforcing bar in each corner of the chimney, preferrably in the cells of the brick or block, and grout solid. If you must place the steel between the flue liner and the surrounding masonry we recommend wrapping the flues with 1/8" ceramic fiber paper "socks" before placing the grout to allow the flue liners a lttle room to expand without cracking the exterior masonry . Tie the surrounding masonry horizontally every 18" with steel ladder or K-web, or pencil rod in the bed joints. Exterior chimneys must be anchored at each floor and roof.
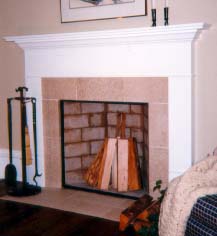
There is really no need to use the surround to make the fireplace deeper. A 4" brick or stone surround is OK but if it's much thicker it may block some of the radiant heat and interfere with the streamline airflow across the throat. Consider mitering or layering a brick or stone surround so that right around the opening it doesn't project into the room more than an inch or two. If tile or other relatively thin material is used for the surround, consider setting it on a backing of cement board or a scratch coat of mortar or plaster over expanded metal lath.
The standard certified Rumford doors are fitted with tempered glass and should be open during a fire or they may break. High temperature neo-ceram glass is optional but not recommended since there is no point in burning a radiant heating Rumford with the doors closed. Doors can, however, be useful to close off a dying fire or when you're not using the fireplace.
The Rumford doors have a minimal frame that is used as a template to facilitate construction of the firebox and when finished reveals only a one inch by 1/8th inch flange. The doors also have a minimal frame that reduces the opening by only one inch top, bottom and sides. The glass doors are easily removable and/or can be exchanged for a screen (optional) during a fire.
| TECHNICAL SERVICE | MANUFACTURER |
|
Buckley Rumford Co. 1035 Monroe Street Port Townsend, WA 98368 360 385 9974 buckley@rumford.com |
Superior Clay Corporation P.O. Box 352 Uhrichsville, Ohio 44683 888 254 1905 sales@superiorclay.com |

[Certified Core] [Plan] [Instructions] [Building a Fire] [Registration & Warranty] [Test Results]
Buckley Rumford Fireplaces
Copyright 1996 - 2001 Jim Buckley
All rights reserved.
webmaster
![[Plan]](certplan.gif)